Again, make a copy of the project you've already created. Just as a precaution, so you can go back to what you've done previously. You also should have completed part 1 and part 2 to do this tutorial.
In this tutorial, we'll add a textbox that allows us to specify a number. In fact, we'll only allow number input and turn on the Pre's NumLock automatically in the text field. This number will be used to increment the count value by that number. We also want to put the text box in an enclosed box with a title. That's a lot of stuff to do for just a simple text box, so let's get to it!
Now, let's modify first-scene.html, so it looks like the following: (Bold text is new)
<div id="main" class="palm-hasheader">
<div class="palm-header">Add/Subtract v.3</div>
The number is currently:
<div id="count" class="palm-body-text">count</div>
<div class="palm-group"> <!-- Creates a "border w/ title around the
textbox -->
<div class="palm-group-title" x-mojo-loc=''>Count by:</div>
<div class="palm-list">
<div class="palm-row single">
<div class="palm-row-wrapper textfield-group" x-mojo-focus-highlight="true">
<div class="title">
<div id="mainTextField" x-mojo-element="TextField"></div>
</div>
</div>
</div>
</div>
</div>
<!-- Yeah, you do need all of this -->
<div id="MyButton" name="MyButton1" x-mojo-element="Button"></div>
<div id="ButtonSubtract" name="ButtonSubtract" x-mojo-element="Button"></div>
<div id="ButtonClear" name="ButtonClear" x-mojo-element="Button"></div>
</div>
Let's examine what this code does:
Now, we need to make the text box do something. Let's modify first-assistant.js so it looks like the following: (Bold text is new)
function FirstAssistant() {
/* this is the creator function for your scene assistant object. It will be
passed all the
additional parameters (after the scene name) that were passed to pushScene. The
reference
to the scene controller (this.controller) has not be established yet, so any
initialization
that needs the scene controller should be done in the setup function below. */
}
FirstAssistant.prototype.handleButtonPress = function(event){
//set a variable to the value of the textbox
this.amount=Number(this.amountModel.value); //This also
converts the text to a number. Important! N must be capitalized!
//increment the total and update the display
this.total = this.total + this.amount;
this.controller.get('count').update(this.total);
}
FirstAssistant.prototype.handleA = function(event){
//set a variable to the value of the textbox
this.amount=Number(this.amountModel.value); //This also
converts the text to a number. Important! N must be capitalized!
//subtract the total and update the display
this.total = this.total - this.amount;
this.controller.get('count').update(this.total);
}
FirstAssistant.prototype.handleC = function(event){
//clear the total and update the display
this.total=0;
this.controller.get('count').update(this.total);
}
FirstAssistant.prototype.setup = function() {
/* this function is for setup tasks that have to happen when the scene is first
created */
/* use Mojo.View.render to render view templates and add them to the scene, if
needed. */
/* setup widgets here */
/* add event handlers to listen to events from widgets */
// set the initial total and display it
this.total=0;
this.controller.get('count').update(this.total);
// Setup Application Menu
this.controller.setupWidget(Mojo.Menu.appMenu, AddSubMenuAttr, AddSubMenuModel);
//Setup Text field and make it numbers only
this.controller.setupWidget(
"mainTextField",
{ //Attributes
maxLength: 1,
//sets a maximum number of characters to 1
modifierState: Mojo.Widget.numLock,
//turns on the numLock for the text field
focusMode: Mojo.Widget.focusSelectMode,
//if the text box is selected, all characters are highlighted
charsAllow: function( charCode ) {
return( ( charCode >= 48 && charCode <= 57) ); //uses ASCII codes to only
allow 1 - 9
}
},
this.amountModel = {
value: ""
}
);
// a local object for button attributes
this.buttonAttributes = {};
// a local object for button model
this.buttonModel = {
buttonLabel : 'Add',
buttonClass : 'affirmative',
disabled : false
};
// set up the buttons
this.controller.setupWidget("MyButton", this.buttonAttributes, this.buttonModel);
this.controller.setupWidget("ButtonSubtract", this.buttonAttributes, this.Model = {buttonLabel
: 'Subtract', buttonClass : 'negative', disabled : false});
this.controller.setupWidget("ButtonClear", this.buttonAttributes, this.Model = {buttonLabel
: 'Clear', buttonClass : '', disabled : false});
// bind the button to its handler
Mojo.Event.listen(this.controller.get('MyButton'), Mojo.Event.tap,
this.handleButtonPress.bind(this));
//Bind event handler for Subtract button
Mojo.Event.listen(this.controller.get('ButtonSubtract'),
Mojo.Event.tap,this.handleA.bind(this));
//Bind event handler for Clear button
Mojo.Event.listen(this.controller.get('ButtonClear'),
Mojo.Event.tap,this.handleC.bind(this));
}
FirstAssistant.prototype.activate = function(event) {
/* put in event handlers here that should only be in effect when this scene is
active. For
example, key handlers that are observing the document */
}
FirstAssistant.prototype.deactivate = function(event) {
/* remove any event handlers you added in activate and do any other cleanup that
should happen before
this scene is popped or another scene is pushed on top */
}
FirstAssistant.prototype.cleanup = function(event) {
/* this function should do any cleanup needed before the scene is destroyed as
a result of being popped off the scene stack */
this.controller.stopListening(this.controller.get('MyButton'), Mojo.Event.tap,
this.handleButtonPress.bind(this));
//Cleanup Subtraction button
this.controller.stopListening(this.controller.get('ButtonSubtract'), Mojo.Event.tap,this.handleA.bind(this))
//Cleanup Clear button
this.controller.stopListening(this.controller.get('ButtonClear'), Mojo.Event.tap,this.handleC.bind(this))
}
A lot of new stuff is going on here. Let's examine what this code does:
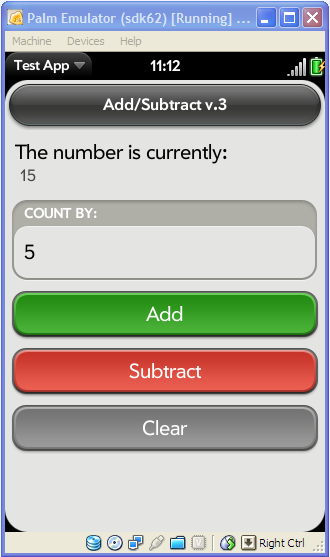
If everything works, then you should see something similar to the following:
This certainly isn't all there is to textboxes. But, it provides a good start and shows some of the attributes you can have. You don't need to create a group, nor limit characters -- You can simply leave those parts of code out. But, it does show how textboxes can be used in WebOS applications.
I hope this information was useful! If you have problems or still need help, I'd recommend asking in the following forums:
Back to Home | Download the v3 Source (.zip) | Download the v3 IPK