Again, make a copy of the project you've already created. Just as a precaution, so you can go back to what you've done previously. The good news: You don't actually need to have completed part 1 to do this tutorial. (But, I think it helps!)
Before we can modify the menu, we need to create another scene. You created one in the original 'Hello World' tutorial, but this time, we'll create one for an About screen. Then, we'll create a menu that brings up that newly created About scene.
So first, let's create the new scene. In the Command Prompt, type:
palm-generate -t new_scene -p "name:About" HelloWorld
This should be fairly obvious what this does, but let's examine each part in a little more detail:
If this completed successfully, then you should now have some new files: about-scene.html (located in the \app\views\about directory) and about-assistant.js (in the \app\assistants directory) of your application directory.
Now, let's modify about-scene.html, so it looks like the following:
<div id="main" class="palm-hasheader">
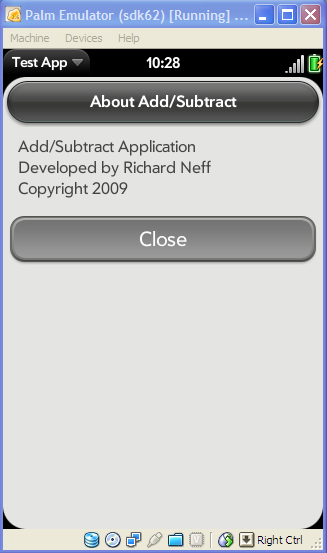
<div class="palm-header">About Add/Subtract</div>
<div id="Info" class="palm-body-text">Add/Subtract Application <br/>Developed
by Me! <br/>Copyright 2009</div>
<div id="CloseButton" name="CloseButton" x-mojo-element="Button"></div>
</div>
Let's examine what this code does:
Let's modify about-assistant.js so it looks like the following: (Bold text is new)
function AboutAssistant() {
/* this is the creator function for your scene assistant object. It will be
passed all the
additional parameters (after the scene name) that were passed to pushScene.
The reference
to the scene controller (this.controller) has not be established yet, so any
initialization
that needs the scene controller should be done in the setup function below.
*/
}
AboutAssistant.prototype.setup = function() {
/* this function is for setup tasks that have to happen when the scene is
first created */
/* use Mojo.View.render to render view templates and add them to the scene,
if needed. */
/* setup widgets here */
/* add event handlers to listen to events from widgets */
// a local object for button attributes
this.buttonAttributes = {};
// a local object for button model
this.buttonModel = {
buttonLabel : 'Close',
buttonClass : '',
disabled : false
};
// set up the button
this.controller.setupWidget("CloseButton",
this.buttonAttributes, this.buttonModel);
// bind the button to its handler
this.controller.listen('CloseButton', Mojo.Event.tap,
this.handlePop.bind(this));
}
AboutAssistant.prototype.handlePop = function(){
//pop the current scene off the scene stack
this.controller.stageController.popScene()
}
AboutAssistant.prototype.activate = function(event) {
/* put in event handlers here that should only be in effect when this scene
is active. For
example, key handlers that are observing the document */
}
AboutAssistant.prototype.deactivate = function(event) {
/* remove any event handlers you added in activate and do any other cleanup
that should happen before this scene is popped or another scene is pushed on
top */
}
AboutAssistant.prototype.cleanup = function(event) {
/* this function should do any cleanup needed before the scene is destroyed
as
a result of being popped off the scene stack */
Mojo.Event.stopListening(this.controller.get('CloseButton'), 'mojo-tap',
this.handlePop)
}
Let's examine what this code does:
But wait! We aren't done yet. We still need to create the menu that displays (pushes) this newly created scene. To do that, we need to modify the stageassistant.js file (found in the \apps\assistants directory)
Modify stateassistant.js to look like the following: (Bold text is new)
function StageAssistant () {
}
StageAssistant.prototype.setup = function() {
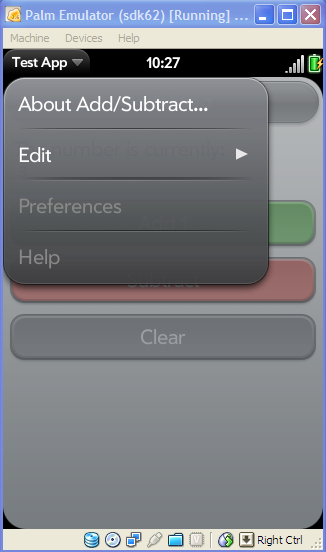
// Setup Application Menu with an About entry
//
AddSubMenuAttr = {omitDefaultItems: true};
AddSubMenuModel = {
visible: true,
items: [
{label: "About Add/Subtract...", command: 'do-aboutAddSub'},
Mojo.Menu.editItem,
Mojo.Menu.prefsItem,
Mojo.Menu.helpItem
]
};
this.controller.pushScene('first');
};
// handleCommand - Setup handlers for menus:
//
StageAssistant.prototype.handleCommand = function(event) {
var currentScene = this.controller.activeScene();
if(event.type == Mojo.Event.command) {
switch(event.command) {
case 'do-aboutAddSub':
this.controller.pushScene("About");
break;
}
}
};
Let's examine this code in more detail:
One last thing we have to do is modify the first-assistant.js file to remove the comment from one line: (Find it and remove the // in front of the statement)
Now, once again, we use the palm-package & palm-install commands from the Command Prompt. Hopefully, if everything is working, you'll see the original application, but now you can select the menu, choose about and see an About screen with a button. When you click the Close button, it should go back to the original application.
If it doesn't, most likely, it's a simply syntax error. This means that you probably mis-typed something. Understand that Javascript (and other programming languages) are not very forgiving of mis-typed words, or even symbols. Something as simple as a missing semi-colon or other character can stop the application from running or prevent a button from appearing. Check and double-check your code!
If everything works, then you should see something similar to the following:
I hope this information was useful! If you have problems or still need help, I'd recommend asking in the following forums:
Back to Home | Download the v2 Source (.zip) | Download the v2 IPK